跌倒检测
前言
跌倒检测主要根据人体姿态来判断,可以用于老人、小孩跌倒监护。本节我们来学习一下如何通过CanMV AI视觉框架和MicroPython编程快速实现人体关键点检测。
实验目的
检测摄像头拍摄到的画面中的人体并判断是否跌倒,通过画图提示。
实验讲解
本实验通过CanMV K230 AI视觉框架开发,详细说明参考 AI视觉开发框架 章节内容,这里不再重复。例程用到的模型已经存放在CanMV K230的文件系统,无需额外拷贝。
具体编程思路如下:
参考代码
'''
实验名称:跌倒检测
实验平台:01Studio CanMV K230
教程:wiki.01studio.cc
说明:可以通过display="xxx"参数选择"hdmi"、"lcd3_5"(3.5寸mipi屏)或"lcd2_4"(2.4寸mipi屏)显示方式
'''

from libs.PipeLine import PipeLine, ScopedTiming
from libs.AIBase import AIBase
from libs.AI2D import Ai2d
import os
import ujson
from media.media import *
from media.sensor import *
from time import *
import nncase_runtime as nn
import ulab.numpy as np
import time
import utime
import image
import random
import gc
import sys
import aicube

# 自定义跌倒检测类,继承自AIBase基类
class FallDetectionApp(AIBase):
    def __init__(self, kmodel_path, model_input_size, labels, anchors, confidence_threshold=0.2, nms_threshold=0.5, nms_option=False, strides=[8,16,32], rgb888p_size=[224,224], display_size=[1920,1080], debug_mode=0):
        super().__init__(kmodel_path, model_input_size, rgb888p_size, debug_mode)  # 调用基类的构造函数
        self.kmodel_path = kmodel_path                      # 模型文件路径
        self.model_input_size = model_input_size            # 模型输入分辨率
        self.labels = labels                                # 分类标签
        self.anchors = anchors                              # 锚点数据,用于跌倒检测
        self.strides = strides                              # 步长设置
        self.confidence_threshold = confidence_threshold    # 置信度阈值
        self.nms_threshold = nms_threshold                  # NMS(非极大值抑制)阈值
        self.nms_option = nms_option                        # NMS选项
        self.rgb888p_size = [ALIGN_UP(rgb888p_size[0], 16), rgb888p_size[1]]  # sensor给到AI的图像分辨率,并对宽度进行16的对齐
        self.display_size = [ALIGN_UP(display_size[0], 16), display_size[1]]  # 显示分辨率,并对宽度进行16的对齐
        self.debug_mode = debug_mode                                          # 是否开启调试模式
        self.color = [(255,0, 0, 255), (255,0, 255, 0), (255,255,0, 0), (255,255,0, 255)]  # 用于绘制不同类别的颜色
        # Ai2d实例,用于实现模型预处理
        self.ai2d = Ai2d(debug_mode)
        # 设置Ai2d的输入输出格式和类型
        self.ai2d.set_ai2d_dtype(nn.ai2d_format.NCHW_FMT, nn.ai2d_format.NCHW_FMT, np.uint8, np.uint8)

    # 配置预处理操作,这里使用了pad和resize,Ai2d支持crop/shift/pad/resize/affine,具体代码请打开/sdcard/libs/AI2D.py查看
    def config_preprocess(self, input_image_size=None):
        with ScopedTiming("set preprocess config", self.debug_mode > 0):                    # 计时器,如果debug_mode大于0则开启
            ai2d_input_size = input_image_size if input_image_size else self.rgb888p_size   # 初始化ai2d预处理配置,默认为sensor给到AI的尺寸,可以通过设置input_image_size自行修改输入尺寸
            top, bottom, left, right = self.get_padding_param()                             # 获取padding参数
            self.ai2d.pad([0, 0, 0, 0, top, bottom, left, right], 0, [0,0,0])               # 填充边缘
            self.ai2d.resize(nn.interp_method.tf_bilinear, nn.interp_mode.half_pixel)       # 缩放图像
            self.ai2d.build([1,3,ai2d_input_size[1],ai2d_input_size[0]],[1,3,self.model_input_size[1],self.model_input_size[0]])  # 构建预处理流程

    # 自定义当前任务的后处理,results是模型输出array的列表,这里使用了aicube库的anchorbasedet_post_process接口
    def postprocess(self, results):
        with ScopedTiming("postprocess", self.debug_mode > 0):
            dets = aicube.anchorbasedet_post_process(results[0], results[1], results[2], self.model_input_size, self.rgb888p_size, self.strides, len(self.labels), self.confidence_threshold, self.nms_threshold, self.anchors, self.nms_option)
            return dets

    # 绘制检测结果到画面上
    def draw_result(self, pl, dets):
        with ScopedTiming("display_draw", self.debug_mode > 0):
            if dets:
                pl.osd_img.clear()  # 清除OSD图像
                for det_box in dets:
                    # 计算显示分辨率下的坐标
                    x1, y1, x2, y2 = det_box[2], det_box[3], det_box[4], det_box[5]
                    w = (x2 - x1) * self.display_size[0] // self.rgb888p_size[0]
                    h = (y2 - y1) * self.display_size[1] // self.rgb888p_size[1]
                    x1 = int(x1 * self.display_size[0] // self.rgb888p_size[0])
                    y1 = int(y1 * self.display_size[1] // self.rgb888p_size[1])
                    x2 = int(x2 * self.display_size[0] // self.rgb888p_size[0])
                    y2 = int(y2 * self.display_size[1] // self.rgb888p_size[1])
                    # 绘制矩形框和类别标签
                    pl.osd_img.draw_rectangle(x1, y1, int(w), int(h), color=self.color[det_box[0]], thickness=2)
                    pl.osd_img.draw_string_advanced(x1, y1-50, 32," " + self.labels[det_box[0]] + " " + str(round(det_box[1],2)), color=self.color[det_box[0]])
            else:
                pl.osd_img.clear()

    # 获取padding参数
    def get_padding_param(self):
        dst_w = self.model_input_size[0]
        dst_h = self.model_input_size[1]
        input_width = self.rgb888p_size[0]
        input_high = self.rgb888p_size[1]
        ratio_w = dst_w / input_width
        ratio_h = dst_h / input_high
        if ratio_w < ratio_h:
            ratio = ratio_w
        else:
            ratio = ratio_h
        new_w = int(ratio * input_width)
        new_h = int(ratio * input_high)
        dw = (dst_w - new_w) / 2
        dh = (dst_h - new_h) / 2
        top = int(round(dh - 0.1))
        bottom = int(round(dh + 0.1))
        left = int(round(dw - 0.1))
        right = int(round(dw - 0.1))
        return top, bottom, left, right

if __name__ == "__main__":

    # 显示模式,可以选择"hdmi"、"lcd3_5"(3.5寸mipi屏)和"lcd2_4"(2.4寸mipi屏)

    display="lcd3_5"

    if display=="hdmi":
        display_mode='hdmi'
        display_size=[1920,1080]
        rgb888p_size = [1920, 1080]

    elif display=="lcd3_5":
        display_mode= 'st7701'
        display_size=[800,480]
        rgb888p_size = [1920, 1080]

    elif display=="lcd2_4":
        display_mode= 'st7701'
        display_size=[640,480]
        rgb888p_size = [1280, 960] #2.4寸屏摄像头画面比例为4:3

    # 设置模型路径和其他参数
    kmodel_path = "/sdcard/examples/kmodel/yolov5n-falldown.kmodel"
    confidence_threshold = 0.3
    nms_threshold = 0.45

    labels = ["Fall","NoFall"]  # 模型输出类别名称
    anchors = [10, 13, 16, 30, 33, 23, 30, 61, 62, 45, 59, 119, 116, 90, 156, 198, 373, 326]  # anchor设置

    # 初始化PipeLine,用于图像处理流程
    pl = PipeLine(rgb888p_size=rgb888p_size, display_size=display_size, display_mode=display_mode)

    pl.create(Sensor(width=rgb888p_size[0], height=rgb888p_size[1]))  # 创建PipeLine实例

    # 初始化自定义跌倒检测实例
    fall_det = FallDetectionApp(kmodel_path, model_input_size=[640, 640], labels=labels, anchors=anchors, confidence_threshold=confidence_threshold, nms_threshold=nms_threshold, nms_option=False, strides=[8,16,32], rgb888p_size=rgb888p_size, display_size=display_size, debug_mode=0)
    fall_det.config_preprocess()

    clock = time.clock()

    while True:

        clock.tick()

        img = pl.get_frame()                        # 获取当前帧数据
        res = fall_det.run(img)                     # 推理当前帧
        fall_det.draw_result(pl, res)               # 绘制结果到PipeLine的osd图像
        print(res)                                  # 打印结果
        pl.show_image()                             # 显示当前的绘制结果
        gc.collect()                                # 垃圾回收

        print(clock.fps()) #打印帧率
这里对关键代码进行讲解:
- 设置显示方式:
通过改变
display的参数选择hdmi或lcd(3.5寸mipi显示屏)显示图像。
    ...

    # 显示模式,可以选择"hdmi"、"lcd3_5"(3.5寸mipi屏)和"lcd2_4"(2.4寸mipi屏)

    display="lcd3_5"

    if display=="hdmi":
        display_mode='hdmi'
        display_size=[1920,1080]
        rgb888p_size = [1920, 1080]

    elif display=="lcd3_5":
        display_mode= 'st7701'
        display_size=[800,480]
        rgb888p_size = [1920, 1080]

    elif display=="lcd2_4":
        display_mode= 'st7701'
        display_size=[640,480]
        rgb888p_size = [1280, 960] #2.4寸屏摄像头画面比例为4:3
    ...
- 主函数代码:
可以看到使用默认配置后只使用了4行代码便实现了获取当前帧图像、AI推理、绘制结果、显示结果 的识别流程。
代码中res变量为识别结果,可以通过终端打印或结合其它章节内容实现跟其它MCU串口通讯、网络传输。
    ...
    while True:

        clock.tick()

        img = pl.get_frame()                        # 获取当前帧数据
        res = fall_det.run(img)                     # 推理当前帧
        fall_det.draw_result(pl, res)               # 绘制结果到PipeLine的osd图像
        print(res)                                  # 打印结果
        pl.show_image()                             # 显示当前的绘制结果
        gc.collect()                                # 垃圾回收

        print(clock.fps()) #打印帧率
    ...
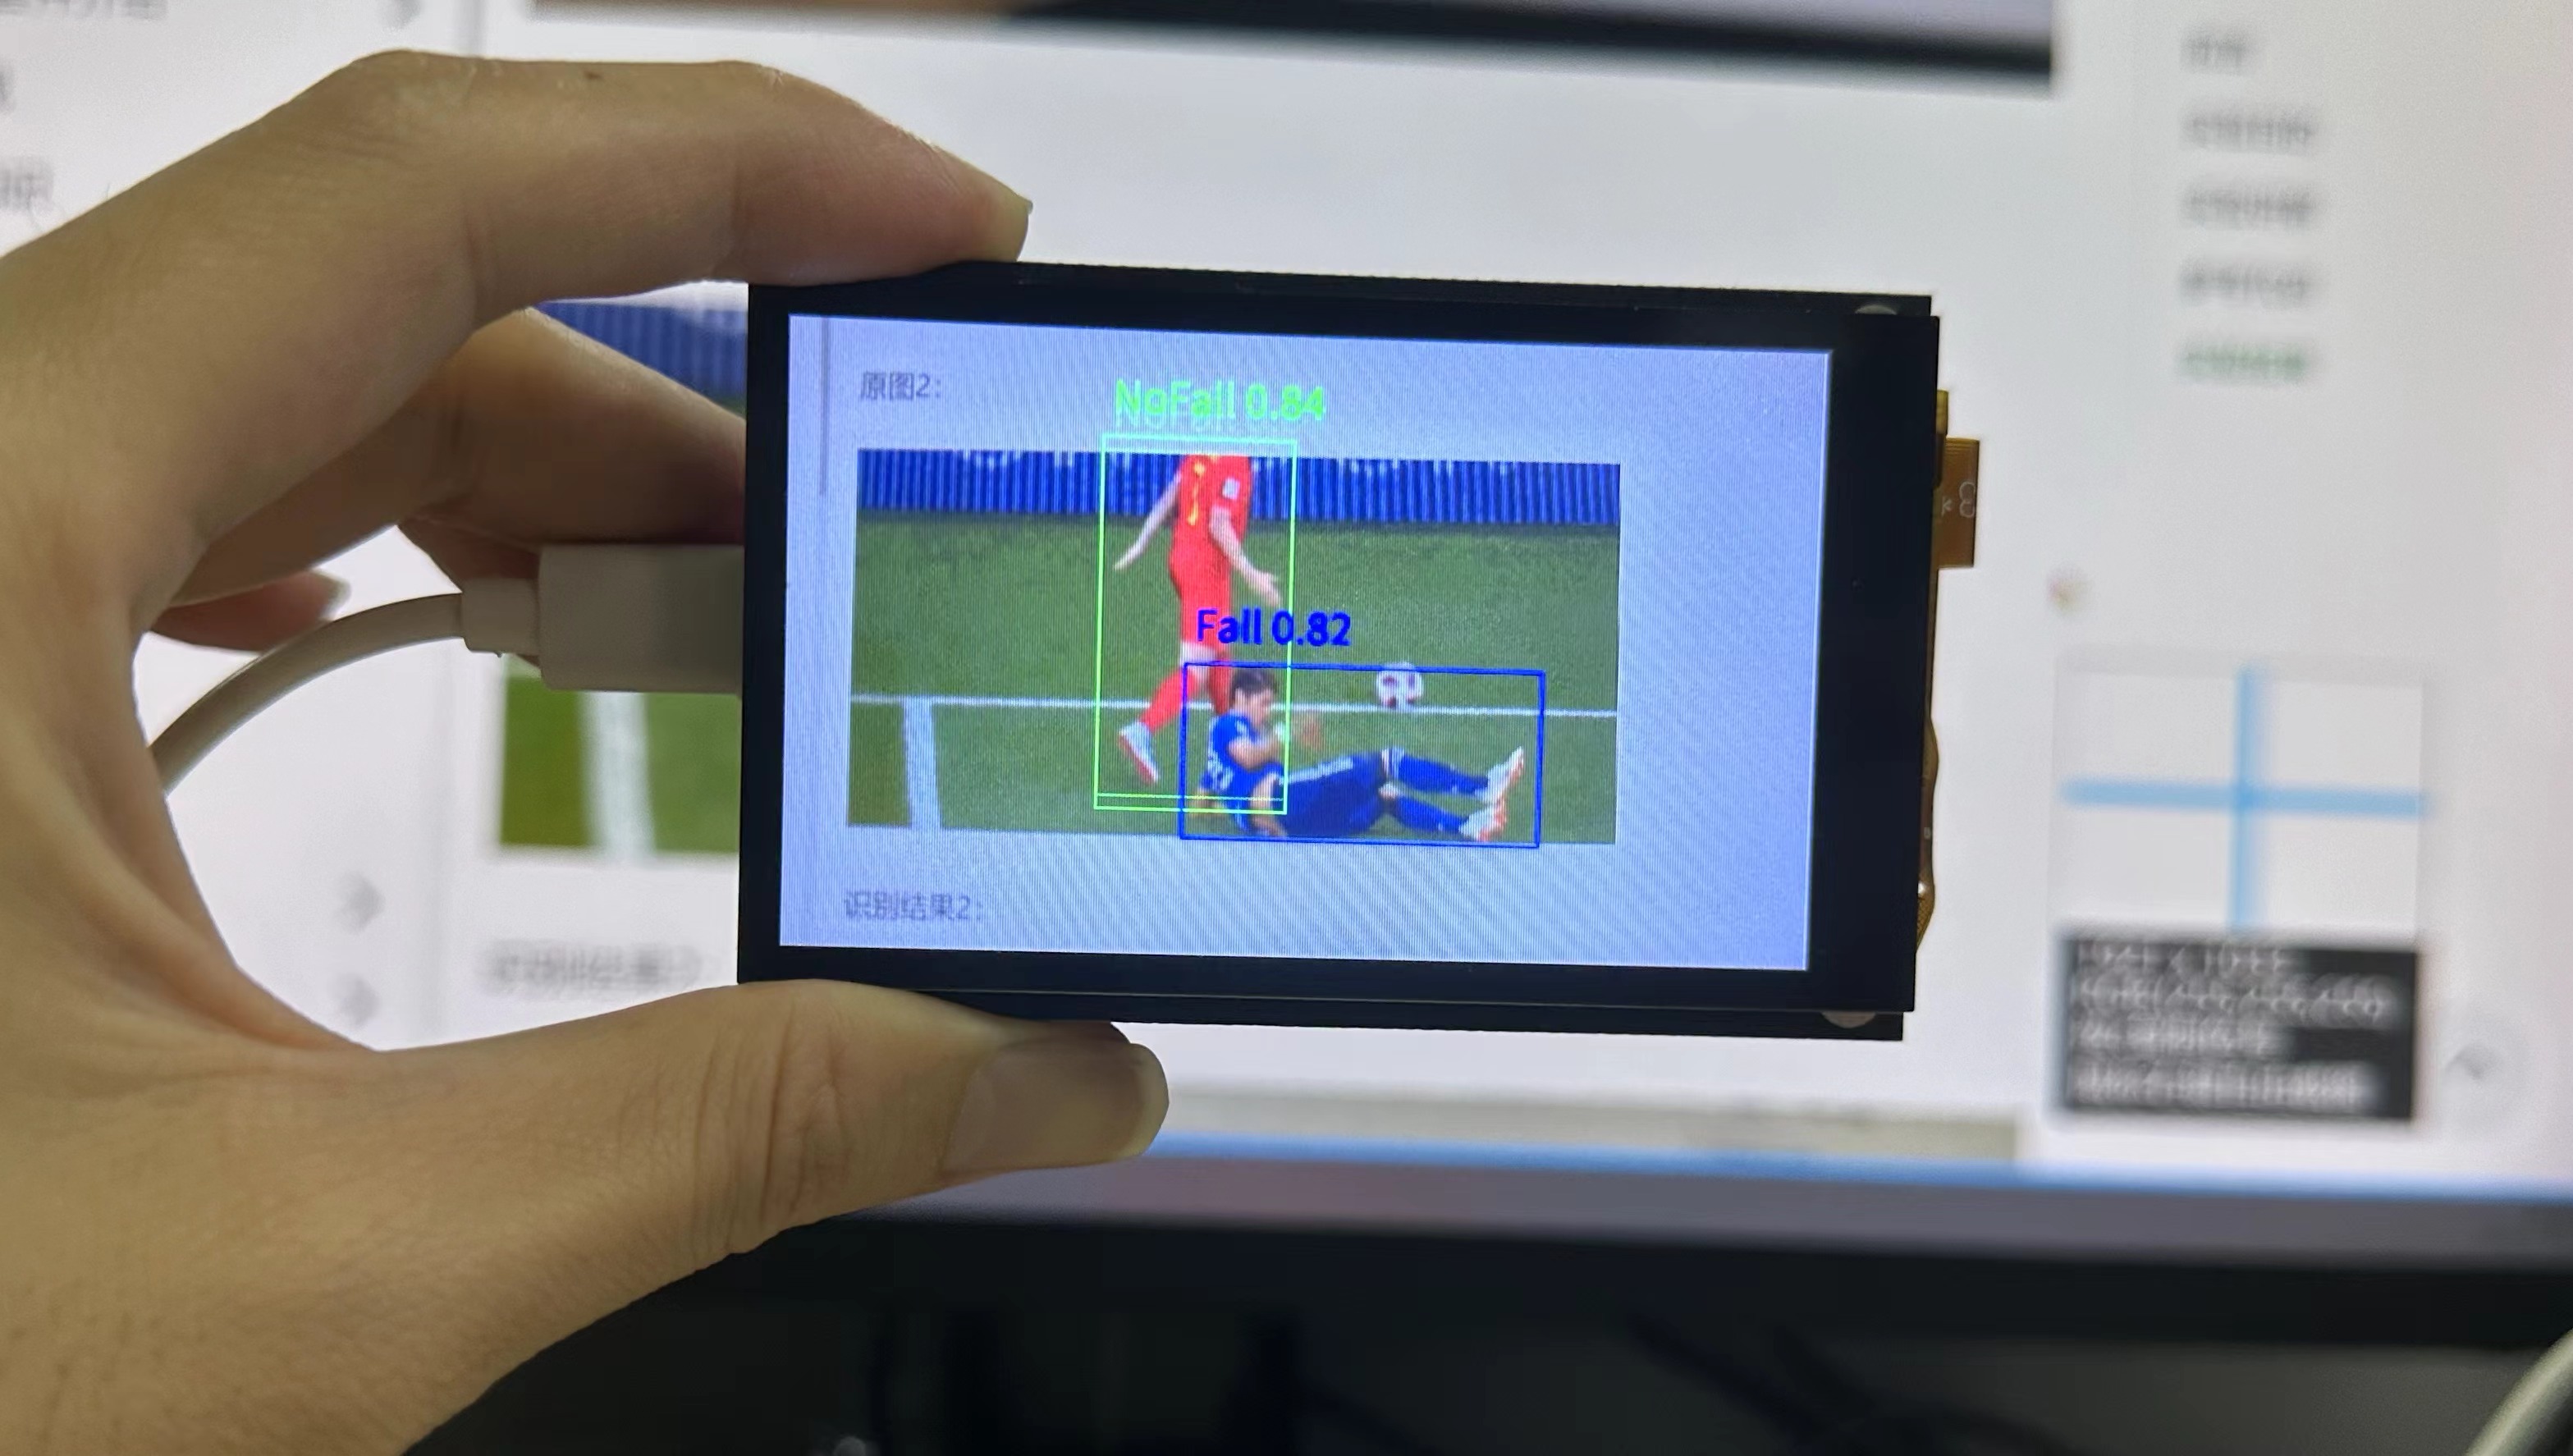
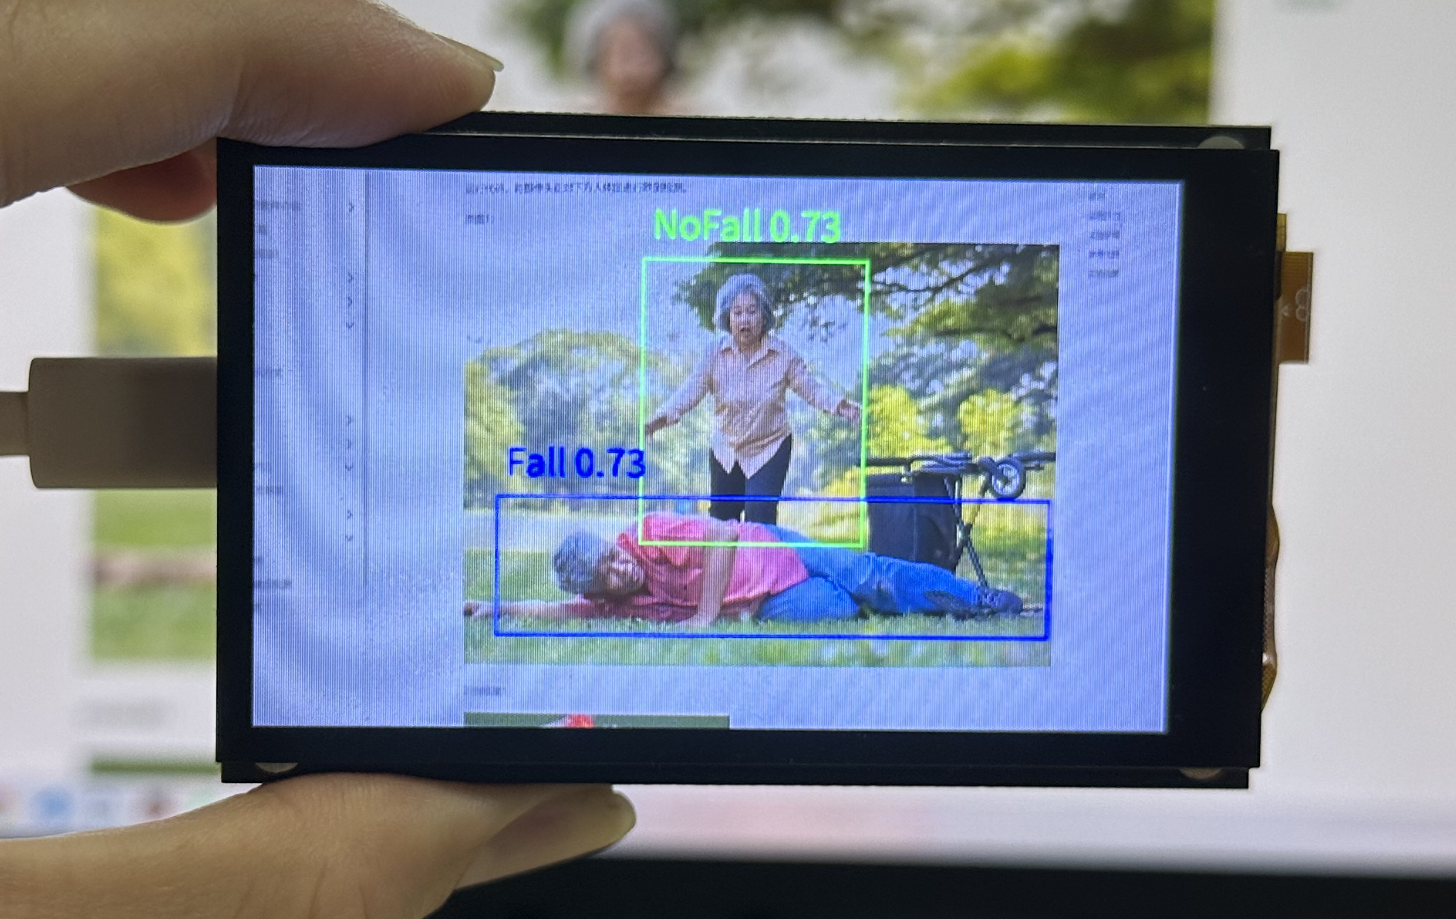
实验结果
运行代码,将摄像头正对下方人体图进行跌倒检测。
原图1:

识别结果1:
原图2:

识别结果2: