Draw
Foreword
After collecting photos through the camera, we will do some processing, and at this time we often need some graphics to indicate, such as marking an arrow at a certain position in the picture, using a rectangular frame to prompt after face recognition, etc. This section is about learning how to use the function of drawing on graphics.
Experiment Purpose
Draw various graphics on the image captured by the camera.
Experimental Explanation
In the previous section, we learned about the application of the camera sensor module. The real-time data collected by the camera is the image. Yes, this section of the experiment is based on the very important image module. CanMV has encapsulated image processing (including drawing) into various modules. We only need to be familiar with its constructor and usage, as follows:
class image
Constructors
img=sensor.snapshot()
Returns the image object captured by the camera.
img=image.Image(path[, copy_to_fb=False])
Create an image object by reading a picture.
copy_to_fb: Choose whether to load large images.True: Can load large images.False: Cannot load large images.
Example:img = image.Image("01Studio.bmp", copy_to_fb=True) #Indicates loading the 01Studio.bmp picture in the root directory.
img=image.Image(w, h, format)
Actively create an image.
w: widthh: heightformat: Image format. Some formats are as follows:GRAYSCALE: Grayscale images;RGB565: 16-bit color; (Most image processing functions use this format.)RGB888: 24-bit true color
Example:img = image.Image(640, 480, image.RGB565) #Indicates creating a 640x480 image in RGB565 format.
Methods
image.draw_line(x0, y0, x1, y1[, color[, thickness=1]])
Draw line.
x0, y0: Starting coordinates;x1, y1: End point coordinates;color: Line color;thickness: Line Thickness;
image.draw_rectangle(x, y, w, h[, color[, thickness=1[, fill=False]]])
Draw a rectangle.
x, y: Starting coordinates;w: width;h: height;color: color;thickness: Border thickness;fill: fill or not.True: fill;False: Not fill.
image.draw_circle(x, y, radius[, color[, thickness=1[, fill=False]]])
Draw circle
x, y: Center of the circle;radius: radius;color: color;thickness: Border thickness;fill: fill or not;、True: fill;False: Not fill.
image.draw_arrow(x0, y0, x1, y1[, color[, size,[thickness=1]]])
Draw arrow.
x0, y0: Starting coordinates;x1, y1: End point coordinates;color: color;size: Arrow position size;thickness: Border thickness;
image.draw_cross(x, y[, color[, size=5[, thickness=1]]])
Draw cross.
x, y: Center coordinates of cross;color: color;size: size of the cross;thickness: order thickness;
image.draw_string(x, y, text[, color[, scale=1[,mono_space=True…]]]])
Draw String。
x, y: Starting coordinates;text: text;color: color;scale: size of the font;mono_space: Mandatory interval;True: interval;False: No interval.
image.draw_string_advanced(x, y, char_size,str,[color, font])
Draw String(support Chinese)
x, y: Starting coordinates;char_size: size of the font;text: text;color: color;font: font type.
For more usage, please read: CanMV K230 Docs
After getting familiar with the drawing function of the image object, we try to draw line segments, rectangles, circles, arrows, crosses and characters in the images captured by the camera. The specific programming ideas are as follows:
Codes
CanMV K230 + 3.5 inch mipi lcd
'''
Demo Name:Draw
Platform:01Studio CanMV K230
Description: Draw various graphics and write characters, and display them through IDE and LCD.
Tutorial:wiki.01studio.cc
'''

import time, os, sys

from media.sensor import * #Import the sensor module and use the camera API
from media.display import * #Import the display module and use display API
from media.media import * #Import the media module and use meida API

sensor = Sensor() #Constructing a camera object
sensor.reset() #reset the Camera
#sensor.set_framesize(Sensor.FHD) #Set frame size to FHD (1920x1080), default channel 0
sensor.set_framesize(width=800,height=480) #Set frame size to 800x480,mipi LCD,channel0
sensor.set_pixformat(Sensor.RGB565) #Set the output image format, channel 0

##############################################################
## 3 different ways to display images (modify annotations)
#############################################################

#Display.init(Display.VIRT, sensor.width(), sensor.height()) #Displaying images via IDE buffer
#Display.init(Display.LT9611, to_ide=True) #Displaying images via HDMI
Display.init(Display.ST7701, to_ide=True) #Display images through 01Studio 3.5-inch mipi display

MediaManager.init() #Initialize the media resource manager

sensor.run() #Start the camera

clock = time.clock()

while True:

    ####################
    ## Write codes here
    ####################
    clock.tick()

    img = sensor.snapshot() #Take a picture

    # Draw a line segment: from x0, y0 to x1, y1, color red, line width 2.
    img.draw_line(20, 20, 100, 20, color = (255, 0, 0), thickness = 2)

    #Draw a rectangle: green without filling.
    img.draw_rectangle(150, 20, 100, 30, color = (0, 255, 0), thickness = 2, fill = False)

    #Draw a circle: no blue fill.
    img.draw_circle(60, 120, 30, color = (0, 0, 255), thickness = 2, fill = False)

    #Draw arrow: white.
    img.draw_arrow(150, 120, 250, 120, color = (255, 255, 255), size = 20, thickness = 2)

    #Draw Cross
    img.draw_cross(60, 200, color = (255, 255, 255), size = 20, thickness = 2)

    #Draw String
    #img.draw_string(150, 200, "Hello 01Studio!", color = (255, 255, 255), scale = 4, mono_space = False)

    #Write characters, support Chinese.
    img.draw_string_advanced(150, 180, 30, "Hello 01Studio", color = (255, 255, 255))
    img.draw_string_advanced(40, 300, 30, "人生苦短, 我用Python", color = (255, 255, 255))

    Display.show_image(img)

    print(clock.fps()) #FPS
CanMV K230 mini + 2.4 inch mipi lcd
'''
实验名称:画图
实验平台:01Studio CanMV K230 mini + 2.4寸mipi屏
说明:画各种图形和写字符, 通过IDE和LCD显示。
'''

import time, os, sys

from media.sensor import * #导入sensor模块,使用摄像头相关接口
from media.display import * #导入display模块,使用display相关接口
from media.media import * #导入media模块,使用meida相关接口

sensor = Sensor(width=1280, height=960) #构建摄像头对象
sensor.reset() #复位和初始化摄像头
sensor.set_framesize(width=640, height=480) #设置帧大小VGA,默认通道0
sensor.set_pixformat(Sensor.RGB565) #设置输出图像格式,默认通道0

#Display.init(Display.VIRT, sensor.width(), sensor.height()) #使用IDE缓冲区输出图像
Display.init(Display.ST7701,width=640, height=480, to_ide=True) #通过01Studio 3.5寸mipi显示屏显示图像
MediaManager.init() #初始化media资源管理器

sensor.run() #启动sensor

clock = time.clock()

while True:

    ################
    ## 这里编写代码 ##
    ################
    clock.tick()

    img = sensor.snapshot()
    # 画线段:从 x0, y0 到 x1, y1 坐标的线段,颜色红色,线宽度 2。
    img.draw_line(20, 20, 100, 20, color = (255, 0, 0), thickness = 2)

    #画矩形:绿色不填充。
    img.draw_rectangle(150, 20, 100, 30, color = (0, 255, 0), thickness = 2, fill = False)

    #画圆:蓝色不填充。
    img.draw_circle(60, 120, 30, color = (0, 0, 255), thickness = 2, fill = False)

    #画箭头:白色。
    img.draw_arrow(150, 120, 250, 120, color = (255, 255, 255), size = 20, thickness = 2)

    #画十字交叉。
    img.draw_cross(60, 200, color = (255, 255, 255), size = 20, thickness = 2)

    #写字符。
    #img.draw_string(150, 200, "Hello 01Studio!", color = (255, 255, 255), scale = 4, mono_space = False)

    #写字符,支持中文。
    img.draw_string_advanced(150, 180, 30, "Hello 01Studio", color = (255, 255, 255))
    img.draw_string_advanced(40, 300, 30, "人生苦短, 我用Python", color = (255, 255, 255))

    Display.show_image(img)

    print(clock.fps()) #打印FPS
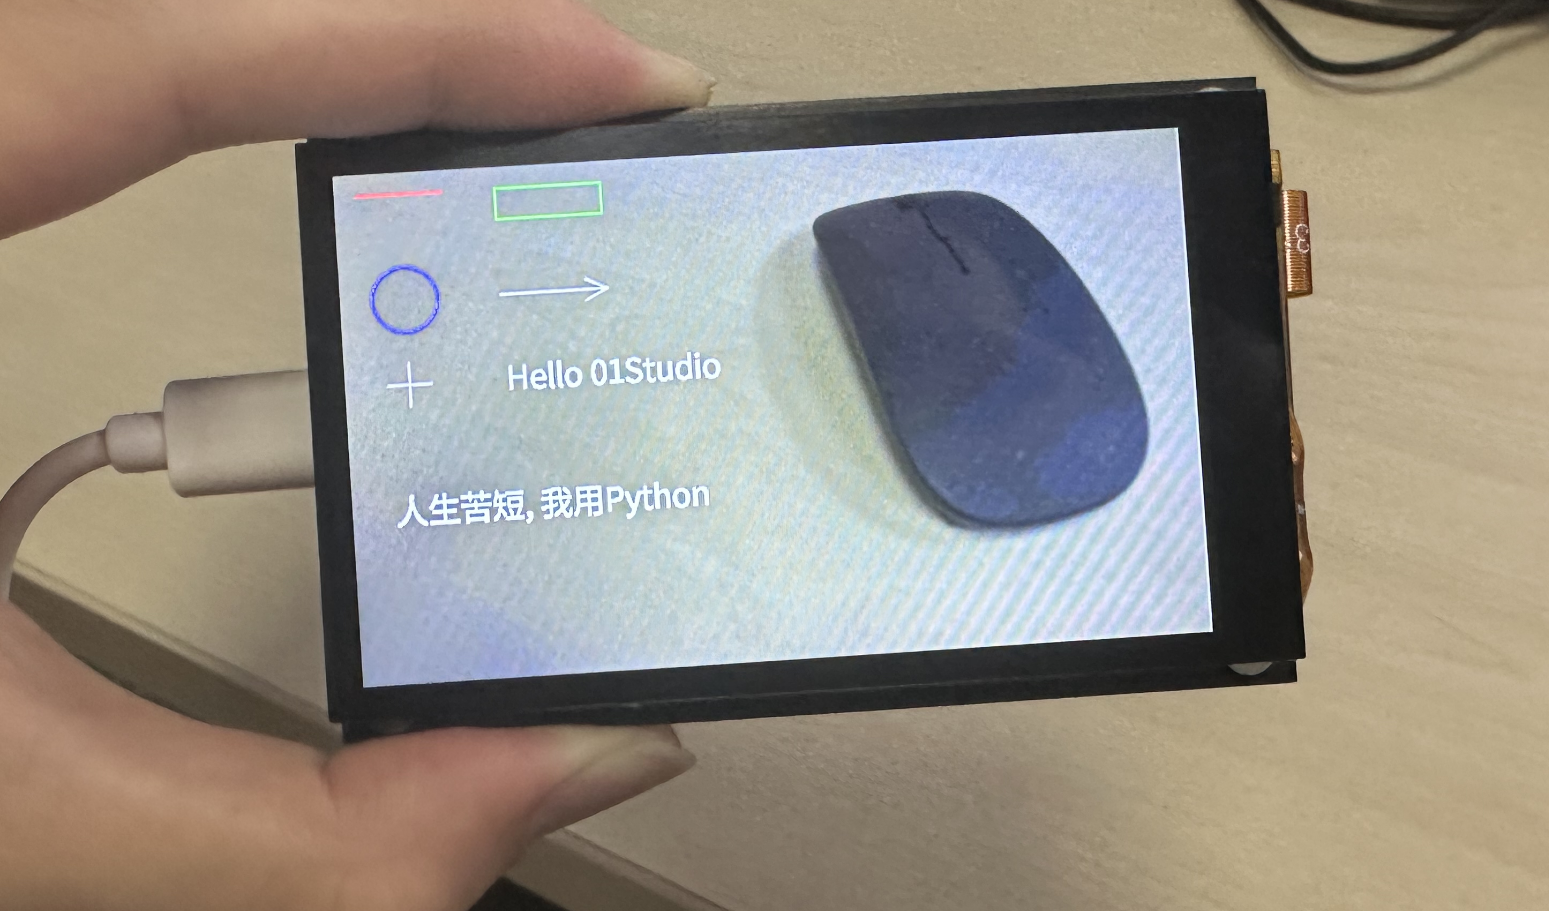
Experimental Results
Open the drawing routine file draw.py in CanMV IDE and click Run. You can see various graphics drawn on the LCD.
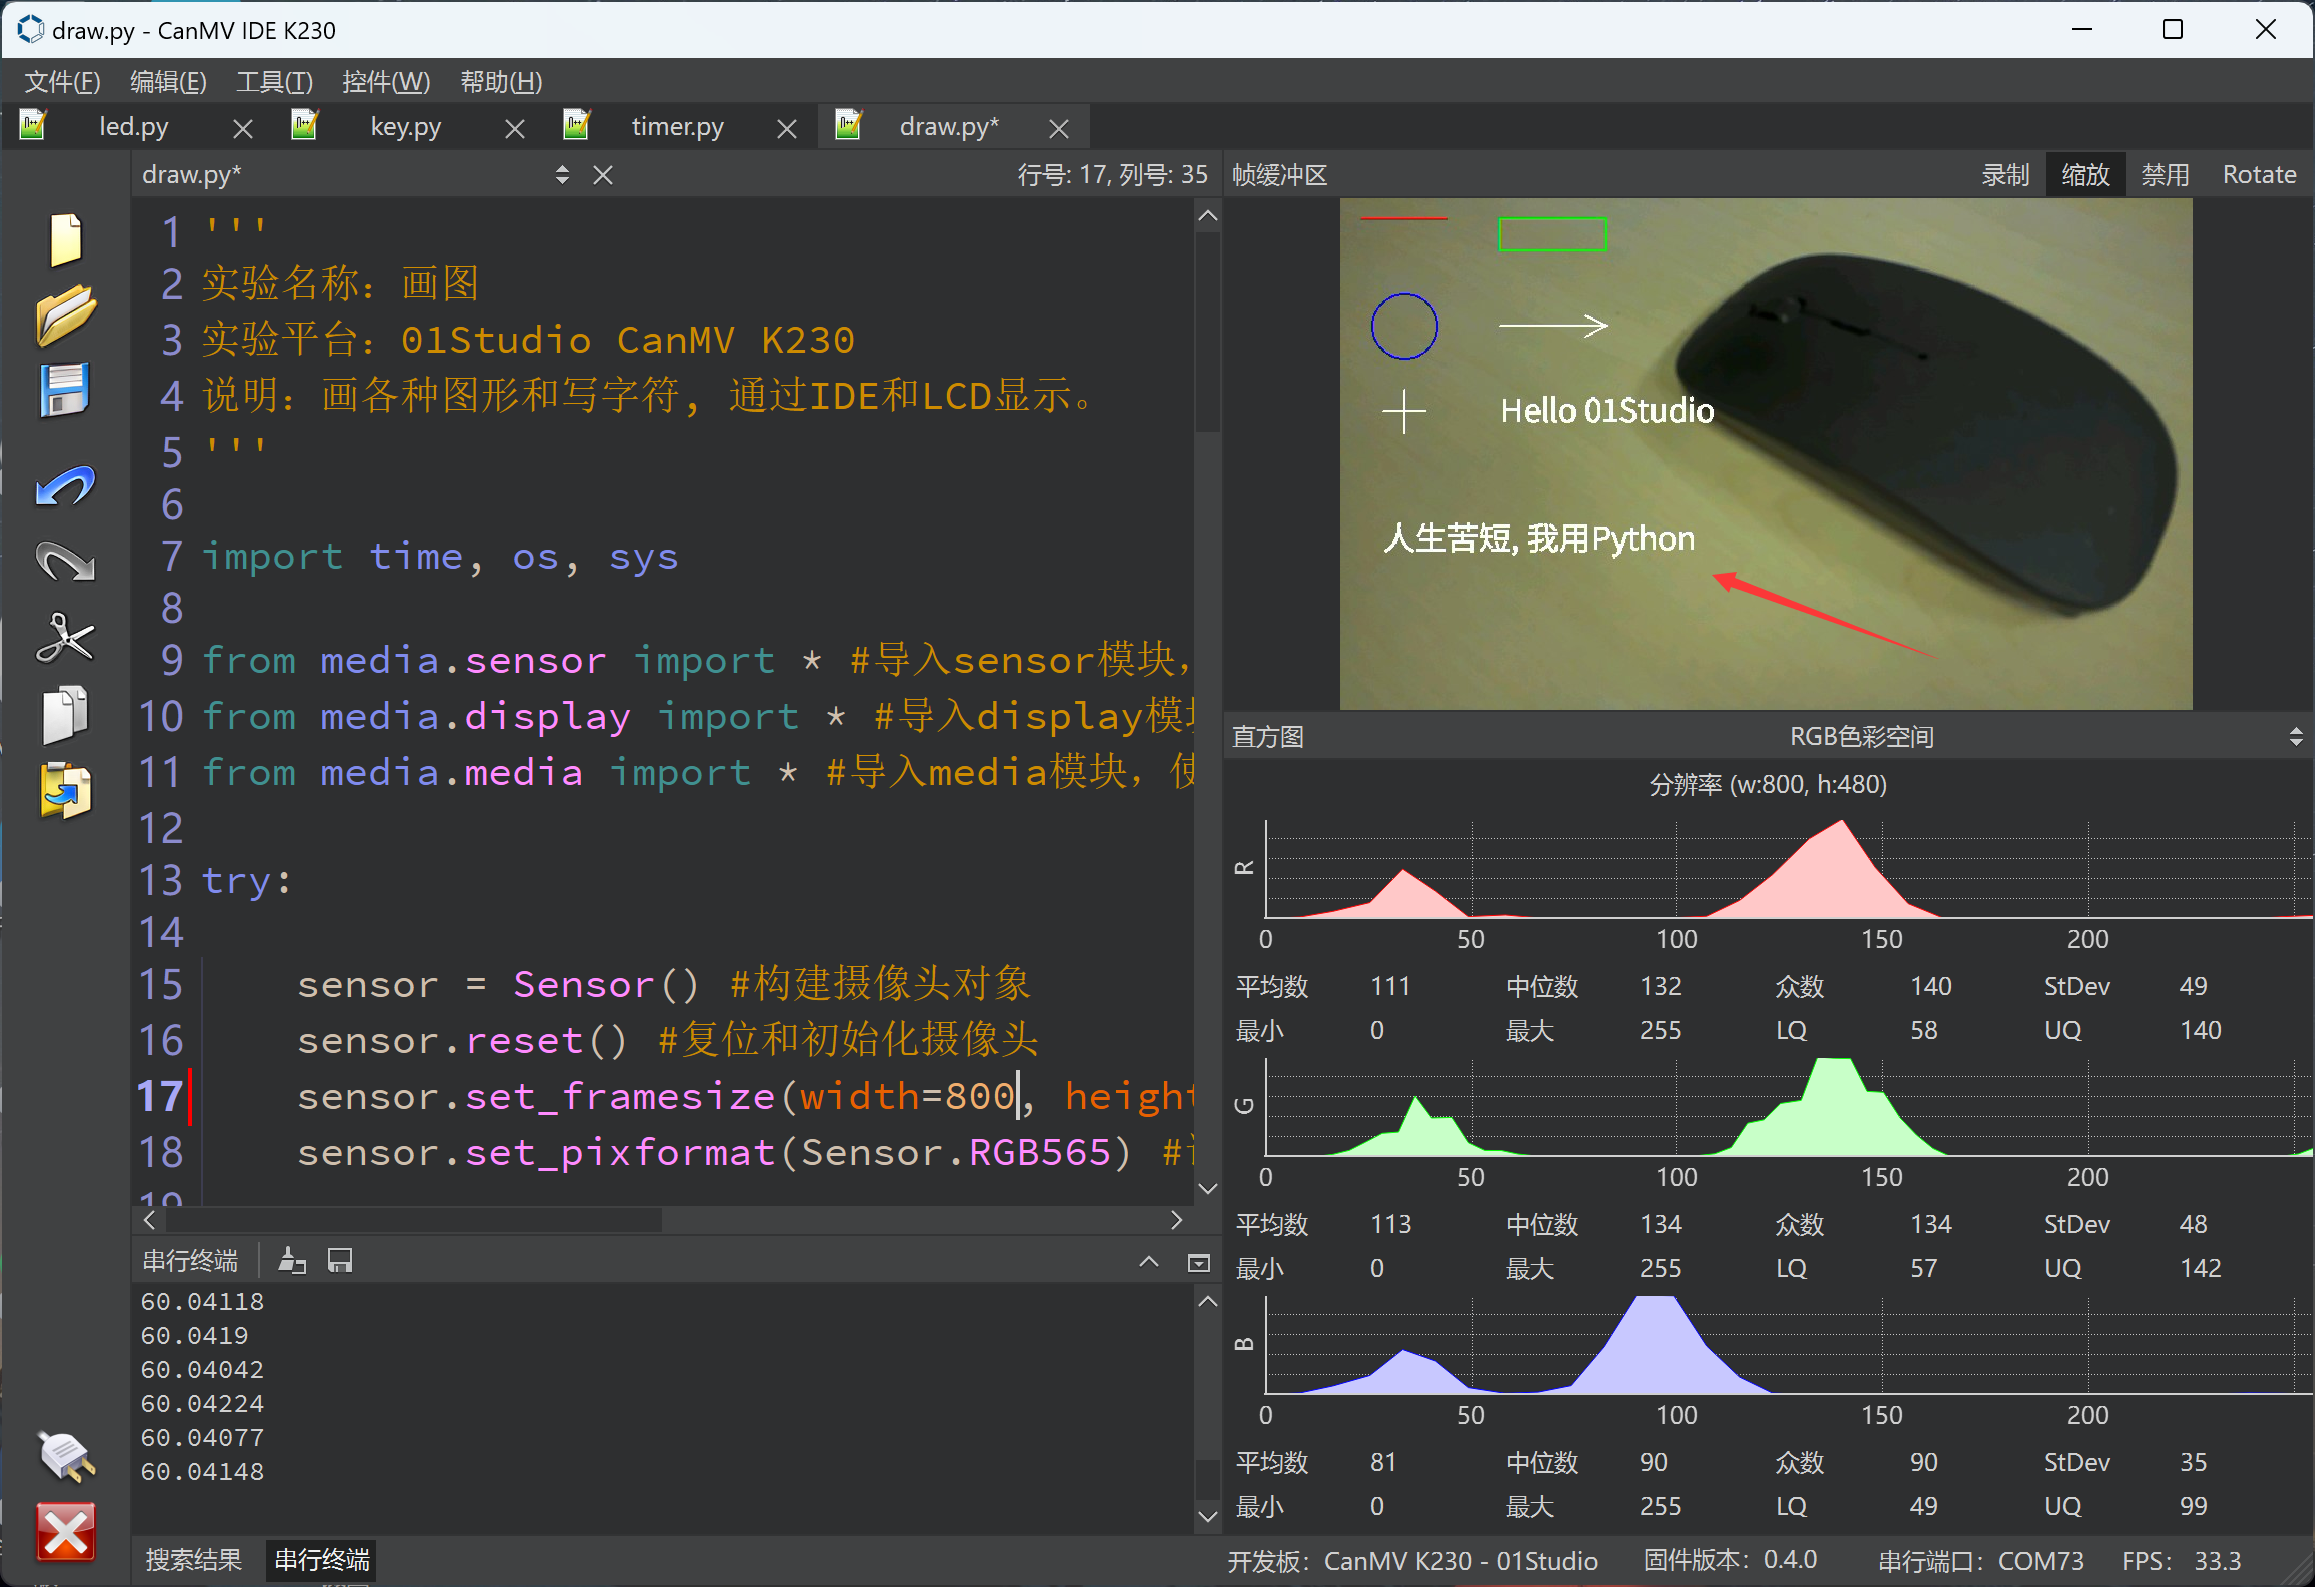
The IDE buffer also has corresponding display:
Drawing graphics is a very basic function and will be used frequently in future experiments, especially when indicating identification content.