圆形检测(彩色图)
实验讲解
圆形检测(彩色)用于识别图像里的圆并画框标注。使用cv_lite库与前面 圆形检测 例程对比速度更快。
rgb888_find_circles对象
构造函数
circles = cv_lite.rgb888_find_circles(image_shape, img_np, dp, minDist, param1, param2, minRadius, maxRadius)
查找图像中的圆形。参数说明:
image_shape: 图像形状,list类型,顺序为[高,宽],如[480,640]img_np: 图像数据引用,ulab.numpy.ndarray类型dp: 累加器分辨率与图像分辨率的反比,float类型minDist: 检测到的圆心最小距离,int类型param1: Canny边缘检测高阈值,int类型param2: 霍夫变换圆心检测阈值,int类型minRadius: 检测圆最小半径,int类型maxRadius: 检测圆最大半径,int类型
使用方法
以上函数返回circles值:圆信息列表,每3个元素为一个圆的信息,包括位置x、y、r
更多用法请阅读 官方文档
代码编写流程如下:
参考代码
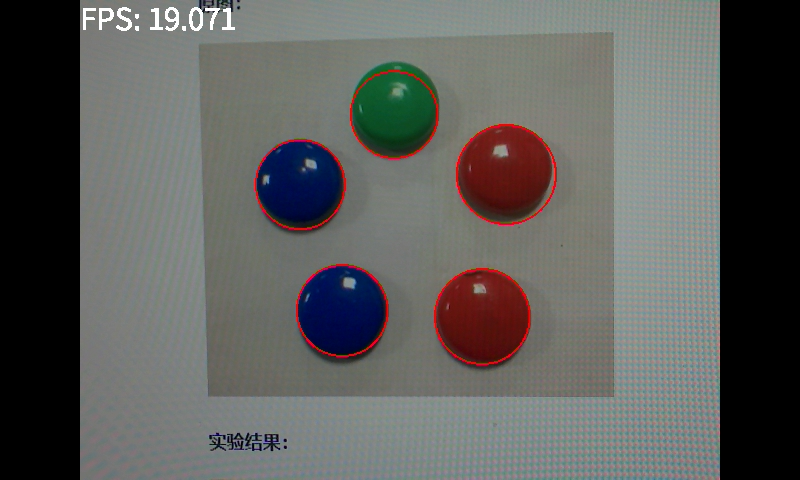
CanMV K230 + 3.5寸mipi屏
'''
实验名称:圆形检测
实验平台:01Studio CanMV K230
教程:wiki.01studio.cc
说明:通过修改lcd_width和lcd_height参数值选择3.5寸或2.4寸屏。
'''

# ============================================================
# MicroPython 基于 cv_lite 的 RGB888 霍夫圆检测测试代码
# RGB888 Hough Circle Detection Test using cv_lite extension
# ============================================================

import time, os, sys, gc
from machine import Pin
from media.sensor import *    # 导入摄像头接口 / Camera interface
from media.display import *   # 导入显示接口 / Display interface
from media.media import *     # 导入媒体资源管理器 / Media manager
import _thread
import cv_lite                # 导入 cv_lite 扩展模块 / cv_lite extension
import ulab.numpy as np       # MicroPython 类 NumPy 库

#CanMV K230 - 3.5寸mipi屏分辨率定义
lcd_width = 800
lcd_height = 480

'''
#CanMV K230 mini - 2.4寸mipi屏分辨率定义
lcd_width = 640
lcd_height = 480
'''

# -------------------------------
# 图像尺寸设置 / Image resolution
# -------------------------------
image_shape = [480, 640]  # 高 x 宽 / Height x Width

# -------------------------------
# 初始化摄像头(RGB888格式) / Initialize camera (RGB888 format)
# -------------------------------
sensor = Sensor(id=2, width=1280, height=960,fps=90)
sensor.reset()
sensor.set_framesize(width=image_shape[1], height=image_shape[0])
sensor.set_pixformat(Sensor.RGB888)  # 设置 RGB888 像素格式 / Set RGB888 pixel format

# -------------------------------
# 初始化显示器(IDE虚拟显示) / Initialize display (IDE virtual output)
# -------------------------------
Display.init(Display.ST7701, width=lcd_width, height=lcd_height, to_ide=True, quality=100)

# -------------------------------
# 初始化媒体资源管理器 / Initialize media manager
# -------------------------------
MediaManager.init()
sensor.run()

# -------------------------------
# 启动帧率计时器 / Start FPS timer
# -------------------------------
clock = time.clock()

# -------------------------------
# 霍夫圆检测参数 / Hough Circle parameters
# -------------------------------
dp = 1           # 累加器分辨率与图像分辨率的反比 / Inverse ratio of accumulator resolution
minDist = 30     # 检测到的圆心最小距离 / Minimum distance between detected centers
param1 = 80      # Canny边缘检测高阈值 / Higher threshold for Canny edge detection
param2 = 20      # 霍夫变换圆心检测阈值 / Threshold for center detection in accumulator
minRadius = 10   # 检测圆最小半径 / Minimum circle radius
maxRadius = 50   # 检测圆最大半径 / Maximum circle radius

# -------------------------------
# 主循环 / Main loop
# -------------------------------
while True:
    clock.tick()

    # 拍摄一帧图像 / Capture a frame
    img = sensor.snapshot()
    img_np = img.to_numpy_ref()  # 获取 RGB888 ndarray 引用

    # 调用 cv_lite 扩展的霍夫圆检测函数,返回圆参数列表 [x, y, r, ...]
    circles = cv_lite.rgb888_find_circles(
        image_shape, img_np, dp, minDist, param1, param2, minRadius, maxRadius
    )

    # 遍历检测到的圆形,绘制圆形框
    for i in range(0, len(circles), 3):
        x = circles[i]
        y = circles[i + 1]
        r = circles[i + 2]
        img.draw_circle(x, y, r, color=(255, 0, 0), thickness=2)  # 红色圆圈

    img.draw_string_advanced(0, 0, 30, 'FPS: '+str("%.3f"%(clock.fps())), color = (255, 255, 255))

    # 显示结果图像 / Show image with blobs
    Display.show_image(img, x=round((lcd_width-sensor.width())/2),y=round((lcd_height-sensor.height())/2))

    # 垃圾回收 / Garbage collect
    gc.collect()

    # 打印帧率 / Print FPS
    print("findcircles:", clock.fps())

# -------------------------------
# 程序退出时释放资源 / Cleanup on exit
# -------------------------------
sensor.stop()
Display.deinit()
os.exitpoint(os.EXITPOINT_ENABLE_SLEEP)
time.sleep_ms(100)
MediaManager.deinit()
CanMV K230 mini + 2.4寸mipi屏
'''
实验名称:圆形检测
实验平台:01Studio CanMV K230
教程:wiki.01studio.cc
说明:通过修改lcd_width和lcd_height参数值选择3.5寸或2.4寸屏。
'''

# ============================================================
# MicroPython 基于 cv_lite 的 RGB888 霍夫圆检测测试代码
# RGB888 Hough Circle Detection Test using cv_lite extension
# ============================================================

import time, os, sys, gc
from machine import Pin
from media.sensor import *    # 导入摄像头接口 / Camera interface
from media.display import *   # 导入显示接口 / Display interface
from media.media import *     # 导入媒体资源管理器 / Media manager
import _thread
import cv_lite                # 导入 cv_lite 扩展模块 / cv_lite extension
import ulab.numpy as np       # MicroPython 类 NumPy 库

'''
#CanMV K230 - 3.5寸mipi屏分辨率定义
lcd_width = 800
lcd_height = 480
'''

#CanMV K230 mini - 2.4寸mipi屏分辨率定义
lcd_width = 640
lcd_height = 480

# -------------------------------
# 图像尺寸设置 / Image resolution
# -------------------------------
image_shape = [480, 640]  # 高 x 宽 / Height x Width

# -------------------------------
# 初始化摄像头(RGB888格式) / Initialize camera (RGB888 format)
# -------------------------------
sensor = Sensor(id=2, width=1280, height=960,fps=90)
sensor.reset()
sensor.set_framesize(width=image_shape[1], height=image_shape[0])
sensor.set_pixformat(Sensor.RGB888)  # 设置 RGB888 像素格式 / Set RGB888 pixel format

# -------------------------------
# 初始化显示器(IDE虚拟显示) / Initialize display (IDE virtual output)
# -------------------------------
Display.init(Display.ST7701, width=lcd_width, height=lcd_height, to_ide=True, quality=100)

# -------------------------------
# 初始化媒体资源管理器 / Initialize media manager
# -------------------------------
MediaManager.init()
sensor.run()

# -------------------------------
# 启动帧率计时器 / Start FPS timer
# -------------------------------
clock = time.clock()

# -------------------------------
# 霍夫圆检测参数 / Hough Circle parameters
# -------------------------------
dp = 1           # 累加器分辨率与图像分辨率的反比 / Inverse ratio of accumulator resolution
minDist = 30     # 检测到的圆心最小距离 / Minimum distance between detected centers
param1 = 80      # Canny边缘检测高阈值 / Higher threshold for Canny edge detection
param2 = 20      # 霍夫变换圆心检测阈值 / Threshold for center detection in accumulator
minRadius = 10   # 检测圆最小半径 / Minimum circle radius
maxRadius = 50   # 检测圆最大半径 / Maximum circle radius

# -------------------------------
# 主循环 / Main loop
# -------------------------------
while True:
    clock.tick()

    # 拍摄一帧图像 / Capture a frame
    img = sensor.snapshot()
    img_np = img.to_numpy_ref()  # 获取 RGB888 ndarray 引用

    # 调用 cv_lite 扩展的霍夫圆检测函数,返回圆参数列表 [x, y, r, ...]
    circles = cv_lite.rgb888_find_circles(
        image_shape, img_np, dp, minDist, param1, param2, minRadius, maxRadius
    )

    # 遍历检测到的圆形,绘制圆形框
    for i in range(0, len(circles), 3):
        x = circles[i]
        y = circles[i + 1]
        r = circles[i + 2]
        img.draw_circle(x, y, r, color=(255, 0, 0), thickness=2)  # 红色圆圈

    img.draw_string_advanced(0, 0, 30, 'FPS: '+str("%.3f"%(clock.fps())), color = (255, 255, 255))

    # 显示结果图像 / Show image with blobs
    Display.show_image(img, x=round((lcd_width-sensor.width())/2),y=round((lcd_height-sensor.height())/2))

    # 垃圾回收 / Garbage collect
    gc.collect()

    # 打印帧率 / Print FPS
    print("findcircles:", clock.fps())

# -------------------------------
# 程序退出时释放资源 / Cleanup on exit
# -------------------------------
sensor.stop()
Display.deinit()
os.exitpoint(os.EXITPOINT_ENABLE_SLEEP)
time.sleep_ms(100)
MediaManager.deinit()
实验结果
在CanMV IDE中运行代码,用户可自行调整参数,比如最小圆半径过滤一些干扰,识别结果如下:
圆形识别:
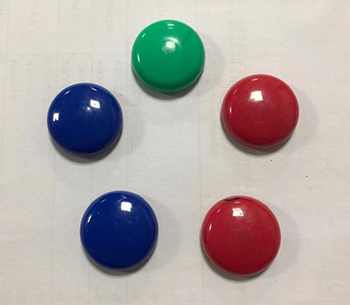
原图:
实验结果: